Administrator Guide
This guide is intended for administrators of the iTop Portal. It covers advanced features such as user account management, synchronization with iTop, cron job setup, and customization of the portal’s appearance using AdminLTE.
Introduction
The iTop Portal serves as a user-friendly interface for interacting with iTop’s ITSM capabilities. As an administrator, you are responsible for managing user accounts, ensuring data synchronization between the portal and iTop, and customizing the portal’s look and feel to match your organization’s branding.
Connection Principle
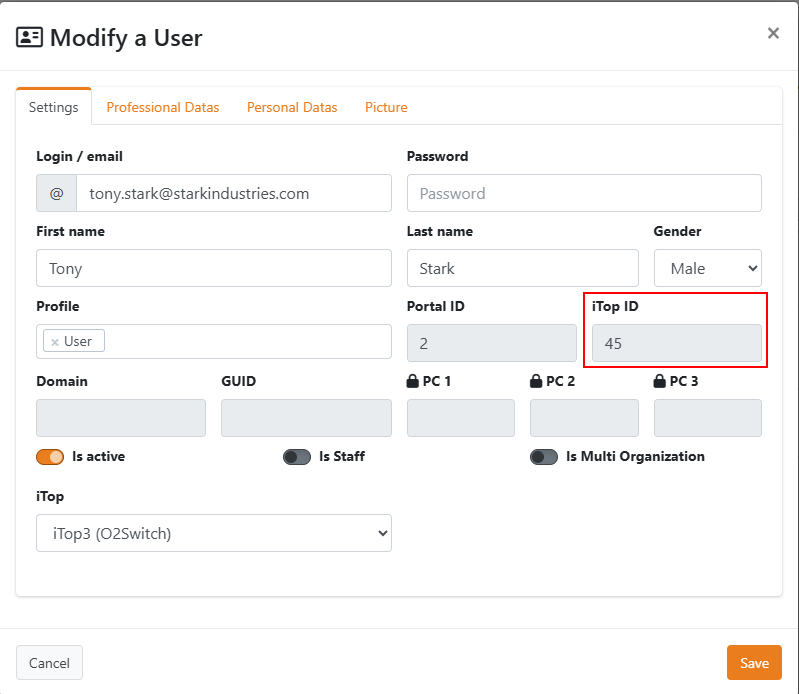
The portal connects to iTop exclusively via the Webservice, ensuring secure and controlled access. All operations triggered from the portal are performed by the Webservice user. However, when adding logs to tickets, it is essential to sign them with the user’s name (e.g., "John Doe wrote:"). This requires each portal account to be linked to an iTop user account.
Ensure that every portal user has a corresponding iTop user account to maintain accurate logging and auditing.
The link is made by itop_id attribute in the Users table.
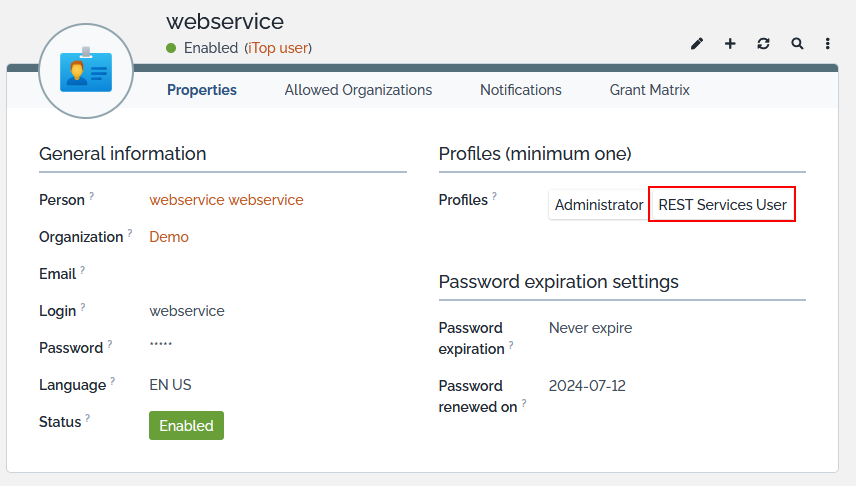
The Webservice user calling the iTop web service must have the specific Rest Service User profile.
Creating User Accounts
There are two primary methods to create user accounts: from iTop or from scratch.
From iTop
You can import Contact records from iTop into the portal. From these Contact records, you can generate:
- An iTop user account.
- A portal user account.
Once generated, the user can log in and use the portal.
Steps:
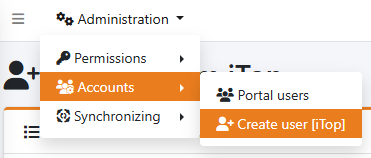
- Navigate to the "Create User" section in the admin panel (Administration --> Account --> Create user [iTop]).
- Select Import from iTop.
- Select the contact for whom you want to create an account.
- Click Create Account.
Check the three statuses: Local Account, Is in iTop, and Remote Account (iTop account).

From Scratch
If the person is entirely new (no existing Contact in iTop), it is recommended to create them directly in the portal. This allows you to:
- Generate the Contact record in iTop.
- Create the iTop user account.
- Create the portal user account.
Steps:
- Navigate to the "Create User" section in the admin panel (Administration --> Account --> Create user [iTop])
- Click on New.
- Fill in the user’s details (name, email, etc.) and validate.
- Select the new user you created and click on Create Account.
- The system will automatically generate the necessary records in iTop and the portal. Check the three statuses: Local Account, Is in iTop, and Remote Account (iTop account).
Synchronizing Organizations and Locations
To avoid frequent Webservice calls for simple SELECT queries, especially since organizational data changes infrequently, the portal synchronizes Organizations and Locations from iTop. This also allows for data enrichment if needed. Synchronization can be performed manually or automated via a cron job. Manual Synchronization:
- In the admin panel, go to Synchronizing.
- Select Organizations or Locations.
- Click Inport from iTop to trigger the synchronization.
Benefits:
- Reduces Webservice load.
- Allows local caching and enrichment of data.
Setting Up a Cron Job for Automatic Synchronization
To automate synchronization tasks, you can set up a cron job on your Linux server. This ensures that data stays up-to-date without manual intervention.
Example Cron Configuration
Create a cron file (e.g., portal-itop) with the following content:
* * * * * www-data cd /path_to_the_portal/ && php artisan schedule:run >> /dev/null 2>&1
path_to_the_portal may be /var/www/itop-portal/for example.
This cron job runs every minute and triggers Laravel’s scheduler, which checks if any scheduled tasks (like synchronization) need to be executed.
Scheduled Tasks in Laravel
Tasks are defined in routes/console.php.
For example:
app(Schedule::class)->command('ItopOrg:sync', [1])->daily('15:10');
app(Schedule::class)->command('ItopLoc:sync', [1])->daily('15:15');
ItopOrg:sync: Synchronizes Organizations daily at 15:10.ItopLoc:sync: Synchronizes Locations daily at 15:15.
Note: Adjust the timing and frequency based on your needs. Ensure the commands are correctly defined in your Laravel application.
Customizing the Portal’s Appearance
The portal’s look and feel can be customized to align with your organization’s branding. This includes changing logos and color schemes.
Changing the Logo
The portal uses AdminLTE for its frontend.
Logo customization is managed in config/adminlte.php.
Main Logo
'logo' => '<b>Portal</b> iTop',
'logo_img' => 'img/itop-logo-square.png',
'logo_img_class' => 'brand-image img-circle elevation-3',
'logo_img_xl' => null,
'logo_img_xl_class' => 'brand-image-xs',
'logo_img_alt' => 'iTop Logo',
Update 'logo_img' => 'path/to/your/logo.png' to use your custom logo.
Authentication Logo
'auth_logo' => [
   'enabled' => false,
   'img' => [ 'path' => 'img/itop-logo-square.png',
               'alt' => 'iTop Logo',
               'class' => '',
               'width' => 50,
               'height' => 50,
            ],
         ],
- Set
'enabled' => trueand update'path' => 'path/to/auth-logo.png'to display a custom logo on the login page. - If
'enabled' => false, the main logo will be used on the authentication page.
Preloader Logo
'preloader' => [ 'enabled' => true,
               'mode' => 'cwrapper',
               'img' => [ 'path' => 'img/itop-logo-square.png',
                           'alt' => 'AdminLTE Preloader Image',
                           'effect' => 'animation__shake',
                           'width' => 60,
                           'height' => 60,
                        ],
               ],
- Customize the preloader image by changing
'path' => 'path/to/preloader.png'.
Changing the Site’s Colors
Since the portal uses AdminLTE, color customization is done via SCSS variables in /resources/vendor/admin-lte/built/scss/_bootstrap-variables.scss.
Example (Switching to Blue Theme):
$blue: #007bff !default;
$indigo: #6610f2 !default;
$purple: #6f42c1 !default;
$pink: #e83e8c !default;
$red: #dc3545 !default;
$orange: #fd7e14 !default;
$yellow: #ffc107 !default;
$green: #28a745 !default;
$teal: #20c997 !default;
$cyan: #17a2b8 !default;
$itop-portal:   #28B4E6 !default;
$itop: #EA7D1E !default;

$primary: $itop-portal !default;
$secondary: $gray-600 !default;
$success: $green !default;
$info: $cyan !default;
$warning: $yellow !default;
$danger: $red !default;
$light: $gray-100 !default;
$dark: $gray-800 !default;
After modifying the SCSS file, recompile the assets:
npm run dev
A blue one :
Tip: For advanced customizations, refer to the AdminLTE documentation and Laravel Mix documentation.
General Ergonomics
The portal is built using the AdminLTE package by Jeroennoten, which provides a responsive and customizable admin interface. You can further tailor the portal’s ergonomics by leveraging AdminLTE’s configuration options.
- Layout Options: Adjust sidebar behavior, dark mode, etc., in
config/adminlte.php. - CSS Overrides: Add custom CSS in
resources/sass/app.scssfor fine-tuned styling.
For more details, consult the AdminLTE GitHub repository and its documentation. --- This guide should help you manage and customize your iTop Portal effectively. For additional support, check the Issues & Bugs (Coming soon) page or contribute to the Roadmap (Coming soon).